Weeding in Market Gardening
 Quelle méthode employer, quel matériel utiliser,...
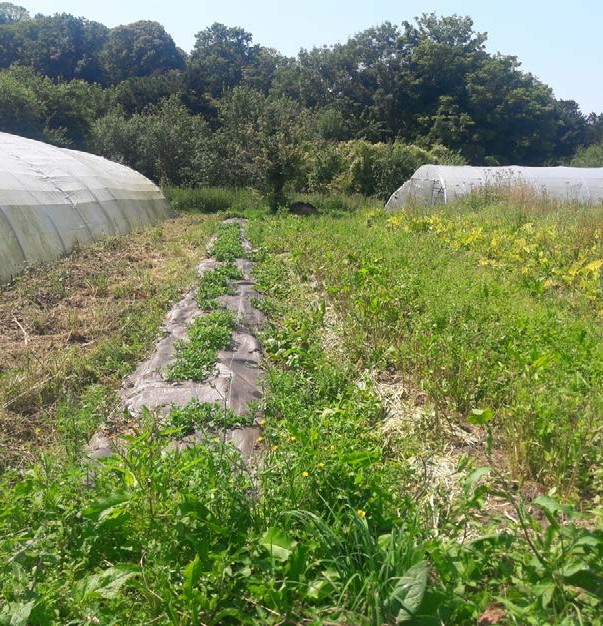
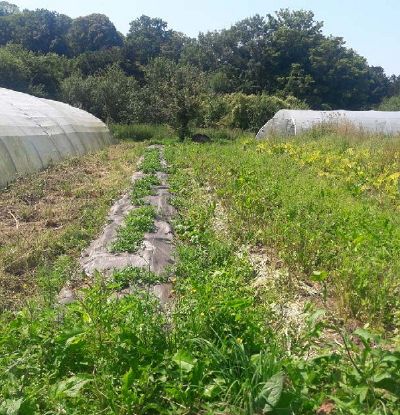
Weeding, thanks to stopping soil tillage and soil cover, becomes very rare in a Living Soil Market Gardening system. Each market gardener has their tolerance for weed cover, but it can be stated that above one weed per m², weeding work is no longer feasible because it is too time-consuming. If weed cover has started but the crop is already well established with more than a month lead time, most crops can tolerate coexistence. You can therefore let the weeds grow, and sheet mulch the plot at the end of the crop to “clean” it for the next crop.
The three types of weeds
- Annuals : “Plant whose vegetative cycle is always less than one year and which flowers only once.”
- Perennials : “Plant living several years but eventually dying after several flowerings.”
- Vivacious : “Species that perpetuate indefinitely by vegetative organs, such as bulbs, suckers, rhizomes, stolons, tubers, tuberous roots [...]. Sexual reproduction plays a minor role in the maintenance and expansion of the species.”
Conditions for breaking seed dormancy
They are linked to three main variables : temperature, humidity and light. A strong variation in these variables triggers seed germination. Therefore, it is necessary to limit these sudden variations. For example, on an already mulched or sheet-mulched soil, one will do a direct seeding or a planting followed by mulching, to avoid the light shock of seeds on the soil surface. No-till avoids the light shock of seeds located in the first centimeters of soil.
A powerful germination capacity
If a mulched crop has become weedy and many seeds have germinated, establishing the next crop may be complicated if it is a seeding without any mulch. To prevent dormancy breaking, consider doing a crop with heavy mulching, such as onions, in year 1, before seeding the following year.
Different tolerances to weed cover of vegetables
For some crops, such as cabbage or broccoli, weed cover at the end of the crop is not a problem since perennials, which inevitably return, are delayed compared to the vegetables that had time to develop and be healthy. A minimum of 2 months delay between the start of the crop and the onset of weeds is needed to avoid stressing the crop.
However, some crops (such as leek, spinach, corn salad, celery) are much more sensitive to competition. For these, a cropping itinerary guaranteeing very little weed cover must be considered.
Management tools
What can be done to avoid weed cover? Occupy the light space : capture it with the plants we want to grow to leave no room for weeds. This can be done by adjusting planting density, associations, etc. The second essential lever is soil cover, whether organic living, dead, or inorganic.
Organic mulching

This method is very effective for controlling annuals, up to the seedling stage but will not manage perennials (bindweed, couch grass,...) which have reserves and common roots allowing them to penetrate very thick layers of straw.
To successfully control weed cover of a crop with a technical itinerary (ITK) planting in straw, a mulch thickness of 20 to 30 cm at the start is needed (about 15 cm will remain after settling). This mulch will be decomposed in one year by soil biological activity. It is even faster in southern France, which limits mulch use.

A weeding tip for mulched plots is to stir the straw in place (using a horizontal axis shredder, at low engine speed and fast forward), to redistribute it evenly and disturb weeds that may have started to germinate inside. Be careful not to shred too finely, as this could reduce mulch effectiveness : the longer the fibers, the thicker the mat and the better the shading. In addition to this mulch lifting, you can mulch again if necessary.
Beware of tendencies to reduce mulching to cut economic costs as it risks being caught up by weeding. The key is to find the right compromise between the cost of organic matter and the cost of weeding.
Sheet mulching


A basic tool for market gardeners and source of many controversies, plastic sheet mulching has several advantages :
- It destroys all types of weed cover without destroying soil life, with reduced hardship.
- It retains moisture and heat favorable to soil development.
- It can be obtained free from livestock farmers : recycling of silage sheets (Possibility to drop damaged sheets at agricultural plastic collection channels Adivalor).
- It can be mechanized, even in a meadow, without disturbing the soil (thanks to the direct incorporation sheet mulcher Regero).
Use of sheets for shading
Planting on sheet
For planting a crop on a sheet, planting immediately after laying a sheet on a meadow can be very tedious. Conversely, leaving a soil sheet-mulched for several months before planting in the sheet limits grass production (spontaneous or perennial) at a time when this production could have maximized soil fertility. Ideally, it is better to allow 1 month between sheet laying (on meadow or grassed bed) and planting in the holes to :
- Slow down the vigor of perennials and avoid regrowth through planting holes.
- Simplify planting operations (more flexible / less dense root system).
Destruction of perennials by sheet mulching
Sheet mulching ensures total destruction of all perennials (dock, nettle, bindweed, couch grass, brambles, …) in 6 growing months (= around summer). Extreme vigilance is needed to ensure perennials such as nettle and especially bindweed do not pass through holes, otherwise sheet mulching will not achieve the weeding goal. In the Mediterranean, where plants are accustomed to drought (and thus more resistant), it is observed that a one-year sheet mulching is needed to destroy perennials.
Destruction of cover crops by sheet mulching
Destruction of a cover crop without perennials usually lasts one month.
Maintaining sheets during fallow periods
Sheets can be left in place for several months after the sheet-mulched crop. They are then removed just before the next crop establishment (clean soil seeding, allium planting with heavy mulching, etc.). This practice facilitates weed management.
Overall sheet mulching strategy
The whole challenge of sheet mulching lies in the following question : how do my practices in year N allow me to have clean soil in year N+1 or even N+2? If you never want to weed, weeds will take over your beds at the end of the crop, and your sheets will return more often to your plots. Some farms choose to simplify weeding by using sheets every other year. Others favor minimal sheet movement, chaining several sheet-mulched crops over more than one year. In these cases, soil ration is supplied for several years before laying the sheet. On a living and less sensitive soil (absence of hydromorphy, not too clayey), crops can last up to 3 years without organic matter input.
In soils sensitive to hydromorphy, it is preferable to insert as many cover crops as possible instead of sheets (or mulching) during winter to drain the soil through plants.
| Type | Woven sheet | Silage sheet | Plastic film |
|---|---|---|---|
| Typical characteristics | 130 g/m² | 130 microns | 20 microns |
| Cost excl. tax | €0.60 / m² | €0 - 0.25 / m² | €0.10 / m² |
| Lifespan | 10 - 30 years | 5 -15 years | 1 year |
| Remarks | Poor for weeding
over 1 month Allows water to pass well |
Retains moisture
(evapotranspiration for 2 years) |
Dry after
Mechanizable |
How to weigh down sheets?

It is relatively difficult to keep sheets during strong winds. Various weighting techniques are used depending on available recycled materials :
- Staples every 3 to 6 m on edges connected by tightened strings.
- Staples every 1 to 3 m on sheet edges + weighting in the center (logs, sandbags, bricks, tiles, slates, concrete blocks, cinder blocks, …).
- Weighting only (usually on silage sheets) (tires, bags of stones, bricks, wood … be inventive but especially generous).
What, plastic?
Alternatives to sheets for weeding are few and unsatisfactory :
- Mechanical weeding is to be avoided.
- Chemical weeding is of course impossible in Organic Farming.
- Thermal weeding does not eliminate perennials and is energy-intensive.
- Hand weeding is often very difficult.
- New materials, such as hemp, are not necessarily strong enough to destroy perennials and are very expensive.
- So-called 100% biodegradable plastic films work well but still use petroleum and leave many residues in the soil.
The environmental consequences of plastic sheet mulching are obviously not negligible but pragmatically it remains currently the best compromise. Let us not forget that a sheet can be second-hand and used for several years (up to 30 years depending on sheets). Moreover, sheet mulching allows transitioning to a living soil system which reduces fossil energy use previously needed for other tasks (running the rototiller, adding more organic matter for cover). Sheets are therefore currently a very good compromise, which will be replaced by cover crops when we have mastered their technical challenge : sufficiently aggressive competitive mix, complete destruction by rolling.
Cover crops
The paragraph "Successfully establishing a cover crop" in Fertility management strategy explains how to succeed with a cover crop. Here we focus on the weed control power of cover crops. A cover crop is a very interesting tool for weed management because it occupies space and thus prevents weed arrival during the intercrop period (the cover crop being easier to destroy than spontaneous weed cover).
Weed management power of cover crops

Various studies[1] have examined the relationships between soil cover and weed presence. They showed that the denser and more covering a cover crop is, the more the density and biomass of weeds are reduced (compared to control plots). These results are mainly explained by the shading effect and root competition. Cover crop effectiveness on weeds depends on :
- Its speed of establishment.
- Its duration of growth.
- The persistence of its biomass in living or dead form after destruction.
- Its capacity to sanitize the soil through allelopathic compounds from its roots.
However, these must be destroyed so as not to hinder the following crop. Flattening a green manure does not guarantee its destruction : equip yourself with secondary tools to secure, such as sheet mulching, thermal burning, or even chemicals for those not in Organic Farming.
Destruction of cover crops

K. Schreiber at the Technical Conferences - 7th National MSV Meetings (1:14:25) proposes an itinerary to destroy a meadow (and probably also a mat of perennials) as follows :
- Destruction of the meadow in autumn (better nitrogen management) by shallow 5 cm work with a rotavator (slow speed).
- Establishment in autumn of an easily destroyed cover crop. Example :
- 50 kg winter or spring rye + 5 kg Micheli clover + 5 kg fodder radish + 50 kg fava beans
- 60 kg fava beans + 10 kg radish fodder + 30 kg hairy vetch massa
- 80 kg fava beans + 30 kg pea fodder + 30 kg common vetch + 4 kg clover squarrosum
- Rolling the cover crop and planting or direct seeding vegetables. (see paragraph "Successfully establishing a cover crop" in Fertility management strategy).
Note this itinerary requires field validation. To be tried on small areas.
Other weed control techniques
False seedbed
A simple sheet mulching is done in two steps : sheet mulching / sheet removal for sowing. The false seedbed technique requires adding an extra step : before the final planned sheet removal, you remove the sheet, water abundantly and sheet mulch again. This additional ephemeral sheet removal characterizes false seedbed : all good conditions (bare and clean soil, light, strong humidity variation) are set to trigger seed bank germination. It occurs 10 to 15 days before sowing. False seedbed does not involve soil tillage, quite the opposite : even a slight scratching after sheet removal would cancel its effects.
Pre-germination
Why pre-germinate seeds?
R. Maiti and K. Pramanik[2], after studying different types of pre-germination on vegetables, listed many advantages related to pre-germination :
- Reduce dormancy.
- Reduce germination time.
- Increase germination rate regardless of temperature.
- Accelerate emergence before soil crust formation becomes problematic.
- Improve uniformity of emergence.
- Limit the need to reseed.
- Have more vigorous plants (notably more tolerant to drought and resistant to climate stress).
- Reach flowering stage earlier.
- Have better yields.
Indirectly, they also note that :
- Seedings are done earlier.
- Harvest is more precocious.
- Crops compete more effectively with weeds.
- The risk of crop failure is reduced (which limits fertilizer use).
- Seeds keep longer.
How to pre-germinate seeds?

There are several techniques for pre-germination. Here is one you can easily do : soak the seeds in water every day and let them dry by draining. This pre-germination technique should be done in a protected place, especially from the sun, with an ideal temperature of 20°C.
- Put the seeds in a sock.
- Soak the sock every day for 12 hours.
- Leave the sock out of water for another 12 hours to drain.
Repeat this program for several days. (Carrot seeds take about three days to germinate under these conditions).
Tip : To anticipate germination timing, make a small control batch starting soaking with a time delay, for example 2-3 days. When this batch germinates, you will know the remaining delay time for the main batch to germinate. Once germinated, sow your seeds quickly.
- Démarrer en maraîchage sol vivant
- Le cycle de la fertilité des sols
- Les vers de terre dans l'écosystème sol
- Diagnostic de son sol
- Stratégie de gestion de la fertilité
- Réaliser son bilan humique
- Gérer l'enherbement en maraîchage sol vivant
- Gestion des maladies et des ravageurs en maraîchage
- Conditionnement et conservation des légumes
- Commercialisation et transformation en maraîchage
- Produire ses propres semences
- L’installation en MSV
- Conversion en MSV
- Jardin amateur
- Verger maraîcher
- Avoir un atelier poules pondeuses
- Introduction aux itinéraires techniques
- Conseils de maraîchers sol vivant

- ↑ Charles R., Wirth J., Büchi L., Sarthou J.P., Justes E., 2013.“Cover crops and allelopathy : where is the research at?” Simplified cropping techniques, 71, 24-25
- ↑ Ratikanta Maiti and Kalipada Pramanik (2013). “Vegetable Seed Priming: a Low Cost, Simple and Powerful Technique for Farmers’ Livelihood”. International Journal of Bio-resource and Stress Management, No. 413, pages 475-481.